In this article will discuss Linux Logical Volume Manager (LVM) Procedure. Below procedure mentioned it is similar for all Linux distributions. A Linux LVM is very similar to a HP-UX LVM and offers many advanced features like snapshots and clusters.
Redundant Array of Independent Disks (RAID0) segment types is supported by LVM. RAID0 distributes logical volume data across multiple data sub-volumes in stripe-size units.
Linux Logical Volume Manager has three conceptual layers:
- Physical volumes
- Volume groups Logical volumes
- File system
The Linux Logical Volume Manager (LVM) is a disk virtualization mechanism. It can create “virtual” disk partitions from one or more physical hard drives, allowing you to expand, contract, or move those partitions from drive to drive as your needs change. It also enables you to create larger partitions than a single drive would allow. LVM has traditionally been used for databases and company file servers, but home users may also want large partitions for music or video collections, or for storing online backups. Linux Logical Volume Manager can also be useful for gaining redundancy without sacrificing flexibility.
In previous article discussed about adding a new disk to Linux Operating System for better overview of disk partition.
The Physical partitions called as Physical Extents (PE), and the logical partitions called as logical Extents (LE).
Creating a Physical Volume (PV):
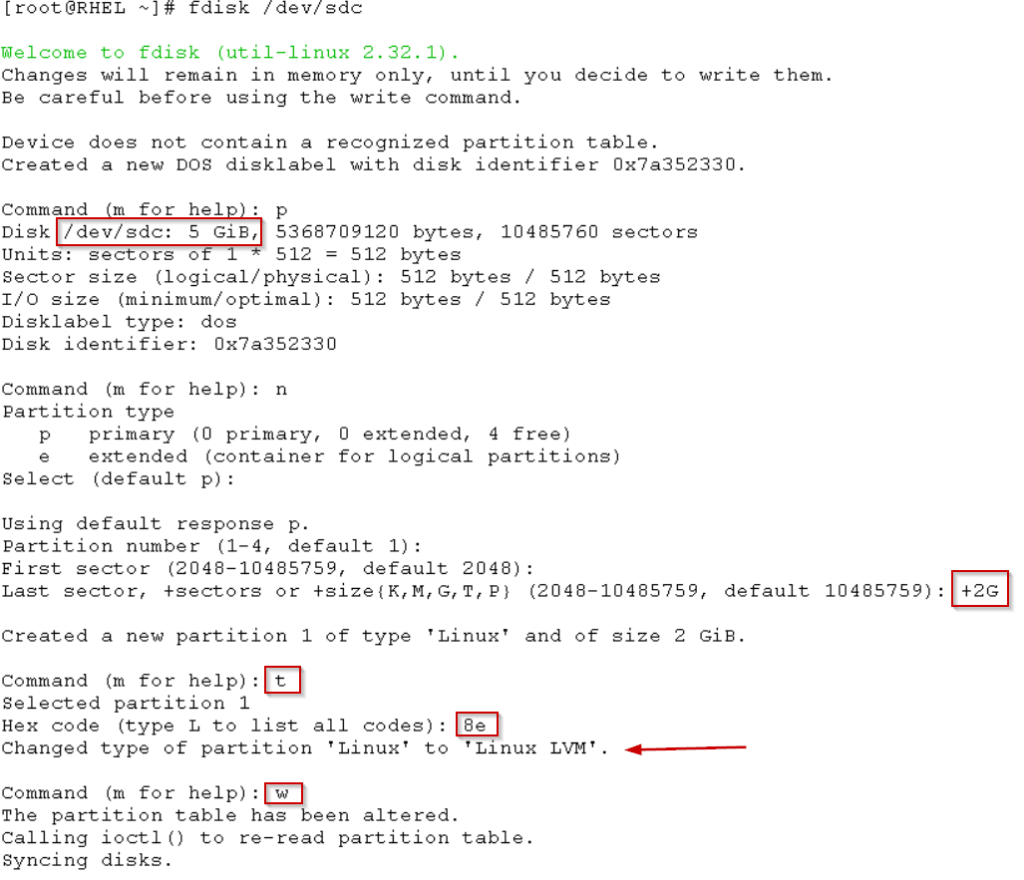
Create a new partition using fdisk, and change the hex code of it to 8e.
/dev/sdc disk contains total 5GB, here we need only 2GB.
Save and exit from the fdisk utility and update the partition table using partprobe command as shown below
Create a PV on the newly created partition /dev/sdc1. Follow the below syntax to create Physical volume.
pvcreate <partition name>
Here the partition name is /dev/sdc1
Creating a Volume Group (VG):
After the successful creation of Physical Volume (PV), now we have to create a volume group by using the below syntax
vgcreate <name for the VG> <PV name>
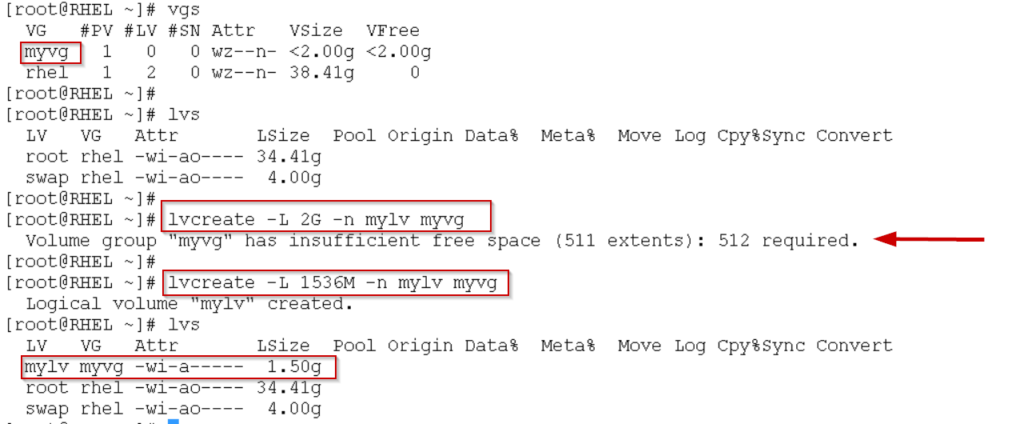
Here Name for the VG is something like myvg
As above screenshot we created PV and named as /dev/sdc1
Logical Volume Creation:
When we have a Volume Group, it’s time to create a new Logical Volume (LV).
The syntax for creating an LV
lvcreate –L <size of LV> -n <name for LV> <VG name>
Size of LV → Provide the size of logical volume in this example it is 2GB
Name of LV →New name we have to give something like mylv
VG name → Name of the Volume group which we created in the previous step called myvg
NOTE:
- LVM labels are placed by default in the second 512-byte sector, but you can overwrite the default by placing them in any of the first four sectors.
vgdisplay
- The following command creates the mylv logical volume to fill the unallocated space within the myvg volume group
lvcreate -l 100%FREE -n mylv myvg
Now add File system to the LV and Mount it as similar procedure
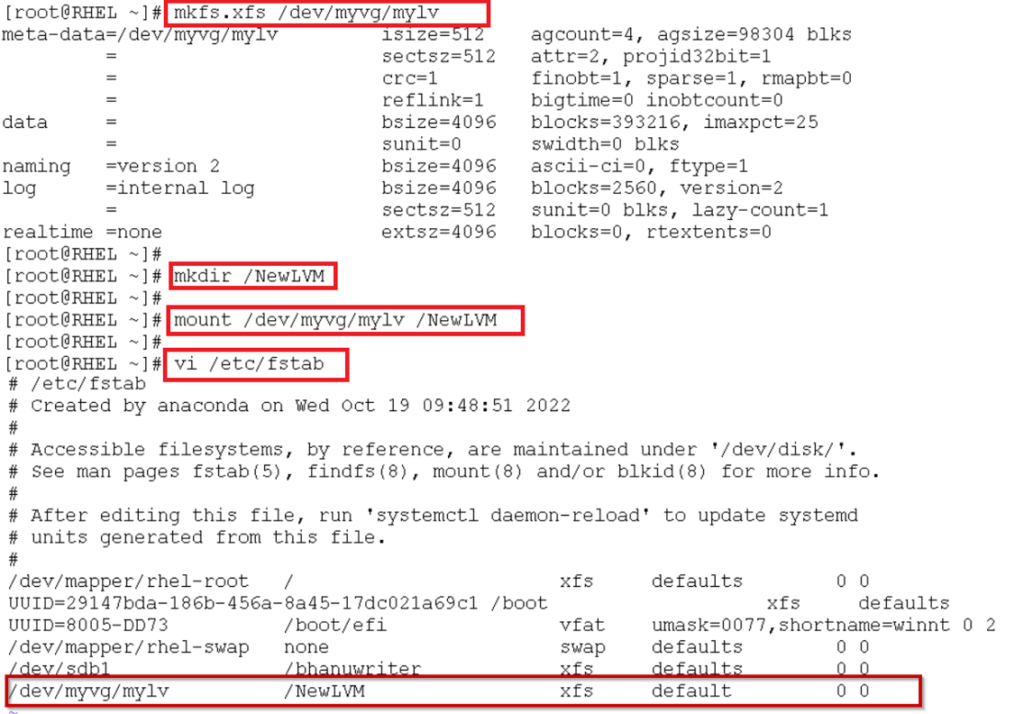
- As of now, we have our VG created so is our LV. To make it accessible we need to format it with a file system like ext4 or xfs
Below is the syntax
mkfs.<filesystemtype> </dev/partition name>
In order to mount, we have to create a mount point
mkdir <name of the mount>
use below command for mounting
mount /dev/VG/LV /name of the mount
To make permanent mounting edit /etc/fstab configuration file
After adding entry into fstab check the following command to display the free space in the file system.
[root@RHEL ~]# df -Th
Filesystem Type Size Used Avail Use% Mounted on
devtmpfs devtmpfs 5.7G 0 5.7G 0% /dev
tmpfs tmpfs 5.8G 0 5.8G 0% /dev/shm
tmpfs tmpfs 5.8G 9.2M 5.7G 1% /run
tmpfs tmpfs 5.8G 0 5.8G 0% /sys/fs/cgroup
/dev/mapper/rhel-root xfs 35G 5.2G 30G 15% /
/dev/sdb1 xfs 10G 104M 9.9G 2% /bhanuwriter
/dev/sda2 xfs 1014M 336M 679M 34% /boot
/dev/sda1 vfat 599M 5.8M 594M 1% /boot/efi
tmpfs tmpfs 1.2G 12K 1.2G 1% /run/user/42
tmpfs tmpfs 1.2G 0 1.2G 0% /run/user/0
/dev/mapper/myvg-mylv xfs 1.5G 43M 1.5G 3% /NewLVM
conclusion:
Linux Logical Volume Manager has been created successfully without rebooting the machine. Before proceeding with the activity, I always recommend taking a snapshot of the virtual machine. For managing quotas, LVM is a good tool.
If you require any further information about Linux Logical Volume Manager, please feel free to contact me.


