In this article discuss about Install OpenSSL on Windows Platform
OpenSSL (Open Secure Sockets Layer) is a small tool but powerful cross-platform open-source utility that can be used in a variety of digital PKI (Public key infrastructure) certificate activities.
OpenSSL is capable of converting digital certificates from one format to another, exporting private keys from certificates, and creating your own Certificate Authority. However, OpenSSL is included in the base packages of the majority of popular Linux distributions. It is not necessary to install OpenSSL on Linux. In the case of the Windows platform, the procedure is not the same.
Install OpenSSL On The Windows Platform is very straightforward procedure. You just need to download and run the OpenSSL installer.
Download the OpenSSL installer
Install OpenSSL On The Windows Platform below are steps need to be performed.
Step1: Download the OpenSSL installer from the official site
Download Win64 OpenSSL v3.0.7 Light with type of file is Windows Installer Package (.msi)
Step2: Install OpenSSL on the Windows machine by running the downloaded installer file. At least 14.1MB of free disk space is required
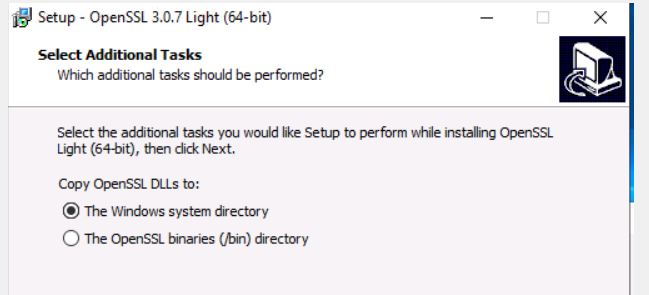
Step3: Select Additional Tasks option as The Windows System Directory
Step4: Select rest of option as default and installation complete successfully.
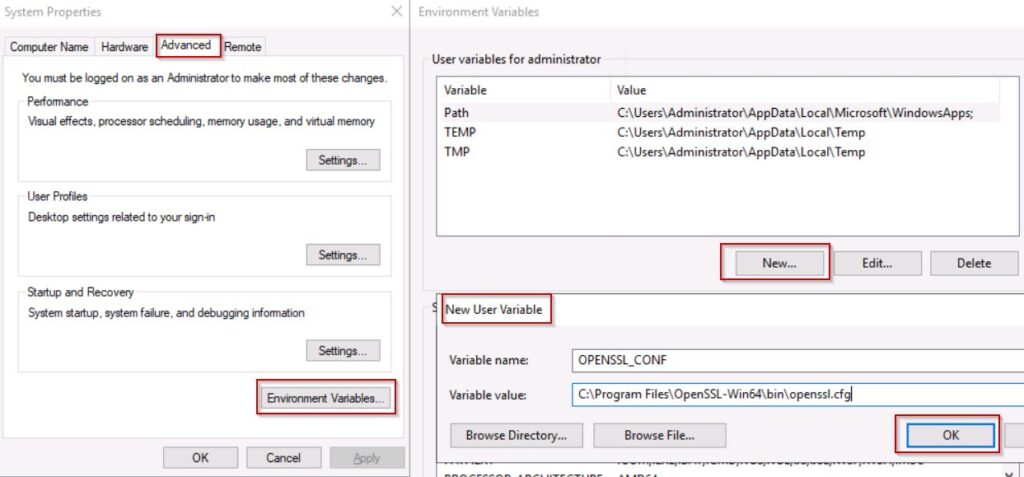
Step5: Set Environment variable for OPENSSL_CONF and Path variables.
open command prompt run as administrator executes sysdm.cpl (SYStem Device Manager Control PaneL applet) click on Advanced –>Environment Variables–>New
Add New User Variable as shown above picture.
Variable name: OPENSSL_CONF
Variable value: C:\Program Files\OpenSSL-Win64\bin\openssl.cfg
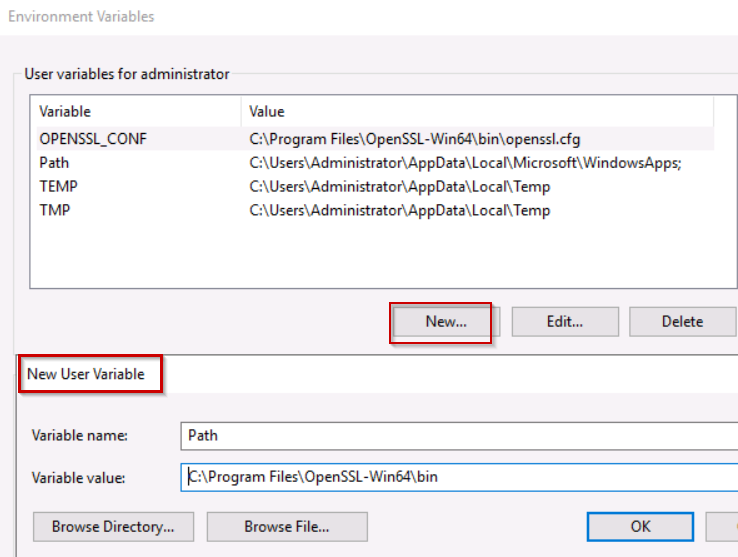
and also add additional path to set in bin level. Click on New to create new variable.
Variable name = Path
Variable Value = C:\Program Files\OpenSSL-Win64\bin
Step6: Now check the functionality of OpenSSL by using below command
openssl version
output
C:\Users\Administrator>openssl version
OpenSSL 3.0.7 1 Nov 2022 (Library: OpenSSL 3.0.7 1 Nov 2022)
Verify OpenSSL functionality in Windows Platform
Let us test SSL/TLS protocol status by using below command
openssl s_client -connect ipaddress:portnumber -tls1
Example: I have windows server 2019 machine need to check TLS1.0 and TSL1.1 version status
output:
C:\Users\Administrator>openssl s_client -connect 192.168.0.1:3389 -tls1
CONNECTED(000000A0)
write:errno=12054
---
no peer certificate available
---
No client certificate CA names sent
---
SSL handshake has read 0 bytes and written 104 bytes
Verification: OK
---
New, (NONE), Cipher is (NONE)
Secure Renegotiation IS NOT supported
Compression: NONE
Expansion: NONE
No ALPN negotiated
SSL-Session:
Protocol : TLSv1
Cipher : 0000
Session-ID:
Session-ID-ctx:
Master-Key:
PSK identity: None
PSK identity hint: None
SRP username: None
Start Time: 1631186847
Timeout : 7100 (sec)
Verify return code: 0 (ok)
Extended master secret: no
---
As you can see above output Server certificate is existing anymore, so it indicates TLS1.0 is in disabled state.
Let’s check for TSL1.1 version
C:\Users\Administrator>openssl s_client -connect 192.168.0.1:445 -tls1_1
CONNECTED(00000140)
write:errno=10354
---
no peer certificate available
---
No client certificate CA names sent
---
SSL handshake has read 0 bytes and written 104 bytes
Verification: OK
---
New, (NONE), Cipher is (NONE)
Secure Renegotiation IS NOT supported
Compression: NONE
Expansion: NONE
No ALPN negotiated
SSL-Session:
Protocol : TLSv1.1
Cipher : 0000
Session-ID:
Session-ID-ctx:
Master-Key:
PSK identity: None
PSK identity hint: None
SRP username: None
Start Time: 1671936121
Timeout : 7200 (sec)
Verify return code: 0 (ok)
Extended master secret: no
---
As you can see above output Server certificate is existing anymore, so it indicates TLS1.1 is in disabled state.
In next article discuss about disable TLS1.0 and TLS1.1 in windows machine.
conclusion:
Install OpenSSL On The Windows Platform has been installed successfully. Security updates for Windows Server Operating System running TLS 1.0 and TLS 1.1 will no longer be available from Microsoft.
Thank you for taking the time to read this brief tutorial. Welcome to this blog to receive future tutorials and security updates.


