The following article will help How to Check User Login History in Windows Server Operating System on Windows Server 2019. Below mentioned procedure is same for windows server2012r2 ,2016,2022.
In a real-time environment, as a Windows Administrator, you must know which users are connected to your server when connected to your server. How many times do they work on your server? As a windows server administrator, you must know when a user disconnects from your server.
Check Login History Windows
The log file is a computer-generated data file containing information on the usage patterns, activities, and operations of an operating system, application, server, client, or other device and is the most commonly used data source for monitoring networks. A log file can provide analysts with insight into the causes of slow queries, errors causing transactions to take longer, or bugs affecting website or application performance.
Event logs can be generated by the windows operating system when hardware or software activity occurs.
An audit of “logon events” records logons on the PCs that are targeted by the policy, and those results appear in the Security Log.
‘Account Logon’ Events track the logins to the domain, and only domain controllers show the results in the Security Log.
Event Log Categories and Types:
- System Log: In the Windows system event log are events related to the system and its components. For example, if the boot-start driver does not load, a system-level event is logged.
- Application Log: The application event log records events related to applications or software installed on Windows computers, such as the problem starting Microsoft Word, or Excel.
- Security Logs: Containing security events are gathered through Windows auditing, which records events related to system security. Examples include failed and valid user logins, file deletions, creation, etc.
- Setup: Windows setup logs contain information about events that occur during the installation process.
- Success Audit: In the security log, a successful login will be recorded as a success audit event.
- Failure Audit: Provides information about failed audited security access, such as an inability to access a network drive.
Procedure to enable auditing of user Logon/Logoff events
Step1:
Create a logon script with the following content on the required domain/organizational unit (OU)/user account. Open a notepad copy the below command and save the file as a .bat file (Windows Batch file). In my example I have saved as userlogin.bat
Echo %computername% %username% %date% %time% >>\\LAB\logdata\userlogin.txt
LAB\logdata → share folder location
Step2:
Create a logoff script with the following content on the required domain/organizational unit (OU)/user account. Open a notepad copy the below command and save it as a .bat file (Windows Batch file). In my example I have saved as userlogoff.bat
Echo %computername% %username% %date% %time% >>\\LAB\logdata\userlogoff.txt
OR
echo %date%,%time%,%computername%,%username%,%sessionname%,%logonserver%
Copy both (Step1 & Step2) batch files into the log data folder on your machine.
Step3:
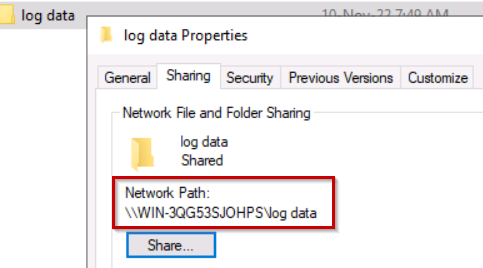
Now share the log data folder by clicking on properties → Sharing → Advanced Sharing → enable check box at share the folder option → click on Permission → select authenticated users
Now go to the security tab → Edit → Add → authenticated users ⇒ full control.
It’s time to check the log data → properties → Sharing → Network Path.
Configuring Login/Logout scripts using GPO
In a Microsoft environment, Group Policy allows you to centralize configuration settings and manage operating systems, computer settings, and user settings. Group Policy is divided into two parts: local Group Policy on individual workstations and Active Directory Group Policy. By using Group Policy, enable auditing at the domain level
Step1: Go to start menu type gpmc.msc in the search bar.
Open GPO and select your domain → create a GPO on that domain and link it.
Login and Logoff users
Step2: Navigate New Group Policy as shown above.
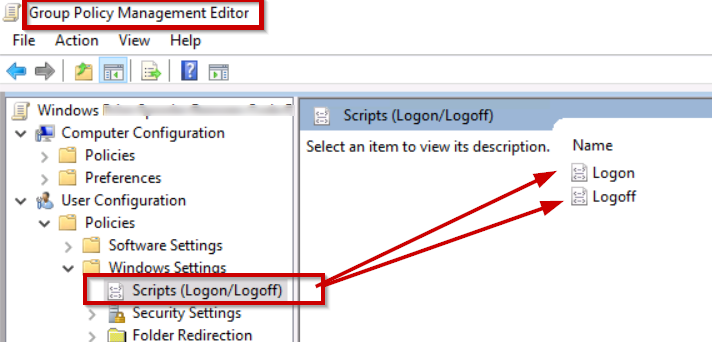
Edit → User Configuration → Windows Settings → Scripts (Logon/Logoff) → Logon → properties → click on Add →select network path location →select batch file.
By default, Windows will automatically update the Group Policy settings every 90 minutes or server reboots. If you want to apply the policy immediately, you can force a policy update by using the below-mentioned command.
- GPupdate: Used for specifically applying policies that have changed. For instance, if you update the policy to Restrict Software Installations, then this command will only apply that one policy.
- GPUpdate /force: By running this command, all group policy settings will be reapplied. For example, if you have 5 group policies, all 5 will be updated
gpupdate /force
Now login to the client machine, stay for 2-3mints and log off from it.
Again, login into the server machine and check the log data folder. you can find a text files with name of userlogin.txt and userlogoff.txt
conclusion:
How to Check User Login History in window operating system. Userlogin.txt contains the user’s login information and Userlogoff.txt contains the user’s logoff information in text format. In this blog is written deploy software using Group Policy Object (GPO).
Thanks for your time, if you have any questions about How to Check User Login History in Windows Server, please leave a comment.


